Summertime in New England is a lot about the ocean (as you would probably assume). At the end of the school year I was inspired by lighthouses and anchors.
This project had three parts.
Part one was drawing the lighthouse on a vertical piece of paper. I decided to go with 6 x 18 paper because I really wanted the students to focus on the verticality of the lighthouses and how they create a landscape (or in this case and 'oceanscape') vertically rather than horizontally.
As a class we looked at various pictures of different lighthouses and also the inside of the light itself.
We discussed the history of lighthouses, why they were created, how people lived there, and how long they had been in existence. Students who had visited lighthouses talked about what the inside felt like.
I also showed them some of Edward Hopper's paintings of New England and lighthouses.
The students drew the lighthouse first with pencil. They then added on other parts of their landscape. They were painted with watercolor.
When the students finished this part they looked at pictures and diagrams of fishing trawlers.
They drew the boats on separate paper, painted them, and cut them out.
These were glued on when dry.
Additionally, one class period the students created anchors out of model magic, making sure to leave a hole at the top via looping the model magic or by poking a hole. We painted them with silver tempera.
We put the pictures all together by mounting them on construction paper so that they could have the parts create an interesting composition by going outside of the vertical lighthouse drawing paper.
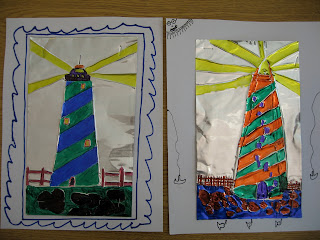
Another lighthouse project I did was with a fourth grade class using the roll of metal.
The key to drawing successfully on this metal if you don't use it often is-
-Making sure the kids have folded newspaper underneath the metal as a cushion so that the pencil can really incise the metal
-Encouraging the students to write on both sides of the metal so that some of the lines and texture can push in and some can pop out
-I like to use the bigger pencils (like the fat ticonderoga ones) rather than regular size pencils
the fat pencils tend to make better marks without poking holes or breaking
-Demonstrate how students can fill in the SPACES with colored sharpie or metallic marker rather than just retrace their lines. This creates a successful silver outline around their drawing and details.


No comments:
Post a Comment