Wednesday, August 21, 2013

Did ya' see?!....

Roylco featured my 
Rock n Roll Romare Bearden lesson on their blog today!

Click here to check it out. 

Monday, August 19, 2013

Ancient Egyptian Portraits made modern


After spending a few classes on head-on portrait drawing
fifth graders switched up their angle and made these
Profile view Egyptian style portraits. 
We looked closely at many examples of Egyptian artwork, discussing notable stylistic details, the significance of head-dresses and skin color, and hieroglyphics.


Sunday, August 18, 2013

Citrus Fruit observational drawing


Observational drawing and creating a balanced composition
were the objectives for this fifth grade lesson. 

The students did practice drawings of the citrus fruits from various angles before we began these, focusing on the slight differences in shape. 
Each student had to draw at least five citrus fruits and arrange a balanced composition. 
I brought actual lemons, oranges, and limes in for the kids to look at as they drew. 
Some students used a little bit of colored pencil before the watercolor
to give them a boost with the shading. 


Friday, August 9, 2013

I'm still alive, new school, & my pinterest issue


Wow- again, I fell off the bus and I apologize to all my readers out there!

I have been just overwhelmed with life for the past couple months, the time has flown by and I have not posted anything. My apologies. I still owe you all some more lessons I haven't gone through the photos of yet- they will come!

In other on-goings I will be moving in a couple weeks, down to the ocean in Rhode Island and couldn't be more excited. With my move comes a new job- so I will be transitioning to a middle school art position. I will try to post the rest of my elementary lessons before my blogs starts to focus more on 6-9th grade.

The photo above is from the Tony Feher show which was part of a big field trip my students took the DeCordova Museum this past spring. The blue mosaic is made from layers and layers of blue painters tape - so cool! Target offers field trip grants  which I applied for last fall and made out trip possible. If you are in need of funds get on it now and apply- totally worth it.

My last rant is something I need to bring up--
It has recently come to my attention that some of the pinterest pins from my blog have been posted with some negative and rude comments attached to them. 
There are many ways to teach and no teachers are exactly alike- that is what makes education evolve and engaging- especially art! It is our job as educators to take a proactive approach not only in the classroom but in all aspects of life and set an example.
Of course people do not agree with all that one finds on the internet, whether it be bloggers, articles, pins, what-have-you- if you aren't into it that is fine, then skip it and move on, but please do not take the good work of others and post/comment/pin in a negative and demeaning way. 
Pinterest is a pin board- it is a tool for visual bookmarking. Every pin on pinterest is taken completely out of its originally and intentional context- by looking at a photo of one piece of a teacher's classroom or teaching materials you cannot know what grade, demographic, subject, or anything about what and how they teach. Please remember that before you post un-informed comments. That is all. 

On a brighter note- I have a surprise ahead on August 21st, stay tuned!


Wednesday, May 1, 2013

Kinder Habitat Accordion Artist Books


My inspiration for this project came from That Artist Woman's tutorial of how to make file folder books!
Her examples are amazingly paint and collage filled. Due to the very small size of my classroom and other constraints I couldn't approach my project with covering the pages with so many materials but the file folder book worked still worked perfectly as the basis for this project. It was actually how I came up the idea to put the habitat studies altogether rather than making separate pieces of habitat-inspired art this year. 
(Thank you Gail!)


Kindergarten made "Artist Books" that showcased four habitats that they had studied in science. 
Each habitat had artwork made in the style of a notable artist. 
I specifically picked two male and two female artists and very different art styles to focus on. 
The file folder books worked great because each artist and habitat had a: 
-back ground artwork that was attached to the book
-an animal for that habitat that could be housed in the pocket but then taken out
-a title paper for each habitat and artist

Our artists & habitats:
1. The coral reef in the style of Georgia O'keeffe
2. The rainforest in the style of Romare Bearden
3. The arctic in the style of Lee Krasner
4. The desert in the style of Roy Lichtenstein


1. Coral Reef in the style of Georgia O'keeffe : color variation & paint
For this I had the students focus on how Georgia O'keeffe is able to create many shades of a color, looking at the various tones of blues and reds and purples she includes in each piece of art. 

Background: 
Crayon resist with construction paper salmon/coral colored crayons,
we painted with watercolor using two different blues (royal blue and turquoise)
to try and mimic O'keeffe's variation in color. 

Animal:
Seahorses!
The kids drew horizontal yellow marker lines on the watercolor paper before painting it
to create the seahorse texture then cut out the seahorse shapes. 

2. Rainforest in the style of Romare Bearden : collage

The background and animals focused on collage of course!
Background: tree trunks of brown construction paper and then lots of leaves using tissue paper.

Animal:
Parrots!
I had saved rainbow painted paper the kids had made a while back. 
We used the paper to cut out the feathers for the parrots. 


3. Arctic in the style of Lee Krasner : Abstract Expressionism & movement

I've never really taught a lesson about Lee Krasner. The more I read about her the more fascinating I found her to be. (And she really made me proud to be a woman artist!)
Did you know she's only one of four woman to have a retrospective at MOMA??
(the others being Helen Frankenthaler, Louise Bourgeois, Elizabeth Murray). 

Background: Painted icebergs and snowy water with white tempera. 
 

Animal: Penguins!
They were cut out of a black paper painted in the style of Krasner with white tempera using moving brush strokes.


*The bottom black section was saved to cut the penguin wings out of.


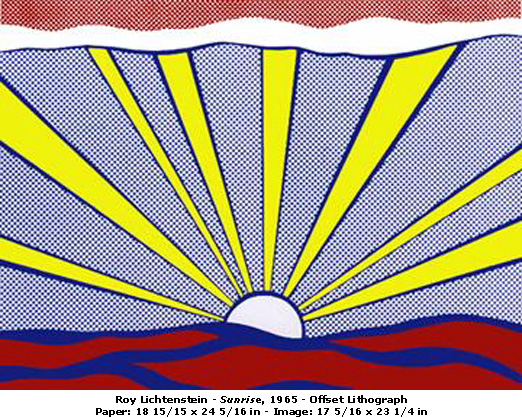
4. The Desert in the style of Roy Lichtenstein : Pop Art

As we looked at a slide show of Lichtenstein's work I had the kids focus on the limited color palette, bold patterns of dots and lines, and cartoon-ish outlines. 

    
Background: Using Lichtenstein's Sunrise as inspirations students created their own version using thin Mr. Sketch markers. The cactus was drawn and cut out separately and then glued down. 

Animal: Lichtenstein Lizards!


Some final products:


The back of the book had bios of each artist. 


Thursday, April 11, 2013

Paper Marbling


Somehow after thinking I've tried everything I realized I've never tried or taught paper marbling with shaving cream. I rounded up the information from a handful of websites and posts so I'm not going to link you to one specifically. Hopefully my pictures are helpful for those wanting to try it though. 

I did this with 6th grade- I did a demo and then they broke into groups of 3-4.
A great teamwork activity!


**For the paint: I slightly watered down my already watery cheap-o tempera paints that I have no use for. My sample with tempera cakes worked also.

Other materials:
Shaving cream (barbasol is fine) 
Cut up mat board or cardboard as the "squeegees" 
Forks, knives, sticks, straws, or "sporks" as we have at school - for dragging the lines.
Tin foil trays
Paper cut down (I had two per kid- 6 x 6")


Spread the shaving cream out in about a half inch layer like frosting

Emphasize to the kids that they should apply the paint in a strategic way. 
The "confetti" approach as I call it albeit fun to do does not come out as cool. 


Demonstrate dragging a tools through the paint puddles going back and forth in one direction-

and then going the opposite cross direction for the next round.


Press the paper down into the paint/shaving cream with medium pressure.
Scrape the shaving cream off with the squeegee tool. 
We had lots of newspaper to keep the tables clean and not overwhelming as we went along.
The kids waiting on their turn to print the paper are helpful for making sure there is an open newspaper to place the shaving cream covered paper down on for scraping. 

You can build off the color remnants in the trays rather than rinsing it all out every time.


... and OF COURSE I forgot to take a picture of the final product after I wiped off the shaving cream. 

But I do have this lovely picture of a bunch of samples:


Tuesday, April 9, 2013

Add these to your wishlist!

frida kahlo

I attended the Hello Etsy! conference a few weeks back at Pratt in Brooklyn.
(As some of you may know I have recently launched a watercolor wedding stationery business called Strawberry Small Works Studio and have been selling on Etsy.)

In the bathroom I noticed a woman with a bag that said "Snack Mountain" on it- a branded name and concept my good friend from college pioneered for her senior thesis she still has in action. If you are looking for a few entertaining videos or more contemporary imagery to show alongside Claes Oldenberg food sculptures for a lesson definitely check out her work:
http://blog.snackmountain.com/


But back to my story---
the woman I met happened to be friends with my friend Lauren and has started a company called Late Greats. Chen is awesome and has a website and etsy store where she sells her hand-made stuffed historical figures.How fun!
Why wouldn't you want Frida or Pablo hanging out in your classroom?? Or better yet waiting for you atop your bed and throw pillows when you get home?
Check it out:
website: http://www.lategreats.com/
etsy: https://www.etsy.com/shop/lategreats


pablo picasso