Thursday, April 11, 2013

Paper Marbling


Somehow after thinking I've tried everything I realized I've never tried or taught paper marbling with shaving cream. I rounded up the information from a handful of websites and posts so I'm not going to link you to one specifically. Hopefully my pictures are helpful for those wanting to try it though. 

I did this with 6th grade- I did a demo and then they broke into groups of 3-4.
A great teamwork activity!


**For the paint: I slightly watered down my already watery cheap-o tempera paints that I have no use for. My sample with tempera cakes worked also.

Other materials:
Shaving cream (barbasol is fine) 
Cut up mat board or cardboard as the "squeegees" 
Forks, knives, sticks, straws, or "sporks" as we have at school - for dragging the lines.
Tin foil trays
Paper cut down (I had two per kid- 6 x 6")


Spread the shaving cream out in about a half inch layer like frosting

Emphasize to the kids that they should apply the paint in a strategic way. 
The "confetti" approach as I call it albeit fun to do does not come out as cool. 


Demonstrate dragging a tools through the paint puddles going back and forth in one direction-

and then going the opposite cross direction for the next round.


Press the paper down into the paint/shaving cream with medium pressure.
Scrape the shaving cream off with the squeegee tool. 
We had lots of newspaper to keep the tables clean and not overwhelming as we went along.
The kids waiting on their turn to print the paper are helpful for making sure there is an open newspaper to place the shaving cream covered paper down on for scraping. 

You can build off the color remnants in the trays rather than rinsing it all out every time.


... and OF COURSE I forgot to take a picture of the final product after I wiped off the shaving cream. 

But I do have this lovely picture of a bunch of samples:


Tuesday, April 9, 2013

Add these to your wishlist!

frida kahlo

I attended the Hello Etsy! conference a few weeks back at Pratt in Brooklyn.
(As some of you may know I have recently launched a watercolor wedding stationery business called Strawberry Small Works Studio and have been selling on Etsy.)

In the bathroom I noticed a woman with a bag that said "Snack Mountain" on it- a branded name and concept my good friend from college pioneered for her senior thesis she still has in action. If you are looking for a few entertaining videos or more contemporary imagery to show alongside Claes Oldenberg food sculptures for a lesson definitely check out her work:
http://blog.snackmountain.com/


But back to my story---
the woman I met happened to be friends with my friend Lauren and has started a company called Late Greats. Chen is awesome and has a website and etsy store where she sells her hand-made stuffed historical figures.How fun!
Why wouldn't you want Frida or Pablo hanging out in your classroom?? Or better yet waiting for you atop your bed and throw pillows when you get home?
Check it out:
website: http://www.lategreats.com/
etsy: https://www.etsy.com/shop/lategreats


pablo picasso

Monday, April 8, 2013

Romare Bearden's Rock Stars


First grade made these super fun collages while studying about Romare Bearden's life and artwork. 
Did you know he was an artist, musician, baseball player, in the army, and had a teaching degree?
So interesting!

There are an abundance of great resources for teaching meaningful in-depth lessons about Bearden. The National Gallery of Art has a fantastic booklet in pdf form (click here ), lots of information on The Bearden Foundation website, and there is a Dropping in on Romare Video (best for grades 2-4) but great for examining his work in depth. 

In the Dropping in on video they show Romare's cat and then you realize the cat is in some of his art works as well. We added his cat to our pictures which is why there is a random cat on some of the rock and roll sets. Some of the kids dressed the cat up as well. Pretty hilarious. 

Early Carolina Morning
Using the checkerboard floor inspiration of Early Carolina Morning the kids started by making 3 rows of checkerboard by gluing down squares of cut up newspaper. (Some of them didn't quite get it as you can see- but for the ones that did it looked really cool.)

Using jazz music and performing musicians as our inspiration the students made musician collages. 
I had photocopies of instruments the kids could cut out for their collage. They had to create a person with the instrument in mind so that the position of the arms made sense. 


Empress of the Blues


Materials we used:
-Newspaper squares for the floor
-Clothes: either fabric or wall paper scraps
-Skin: I bought Roylco skin color paper this year- it has been great for lots of projects.
-Photocopies of pictures of guitars, banjos, brass instruments
-Construction paper scraps
-*** The real crowd please was the hologram paper for the disco ball.  


Thursday, March 7, 2013

Nevelson re-post

Photo courtesy of Design Sponge.

While I'm riding the Louise Nevelson train if you are not a regular reader of Design Sponge it is worth checking out this week's Louise Nevelson shadow box post! Click here.

Tuesday, March 5, 2013

Growing Day by Day at the MFA - the details!


A little delayed- but as promised I am posting the details of and final product photos of my
based on Ellsworth Kelly and Louise Nevelson.


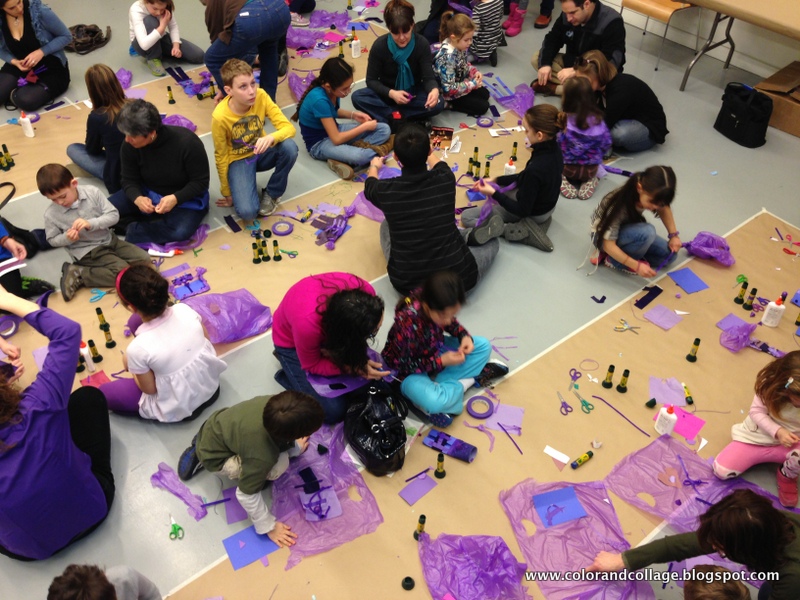
Visitors at the MFA had the opportunity to come in for a session to create a sculpture out of monochromatic materials to be added to the large rainbow collaborative-installation. Many people came to the museum because they had seen the progress on Facebook & Instagram and wanted to be a part of it!
This project literally worked for ALL ages. 
Because the parents/adults were there with the kids age 3-adult was engaged. 

The set up:
Notice in this above picture the platform that facilities made for us. 
We covered it in construction paper (we didn't have time to paint it) to signify where the colored sculptures would go. This was a huge help for both the first groups of artists so they could envision the plan
and for us who were installing them.
The 6 inch raise off the floor gave the installation a lifted feel and allowed us to attached fishing line to the edges of the platform- and slide tape, etc. underneath as we were installing.
There was a copper wire strung across from the two big beams. 
Then fishing line hung vertically and diagonally to the platform for attaching sculptures.

Each child got a "goody bag" with monochromatic materials. 
We also got a hold of these awesome bags in each color from U-line
The artists could use the bags as a material too!
Examples of what was in the bags:
6 x 8" posterboard
tissue paper
pipe cleaners
bottle caps
felt
fabric
raffia
strings/yarn
buttons
foam pieces
popsicle sticks
random recycle center objects


I hosted 5 sessions a day for 5 days. Each session had a color assigned so everyone was working with the same color. This really helped artists focus on the variations in color, tone, and hue as well as focus on the materials. It also helped clean up!! 
We only got ONE complaint about having no color choice the entire week!
In addition to focusing on texture and materials I heavily emphasized how a sculpture can be viewed
from different angles in my introduction so participants would take that into consideration rather than just working 2-dimensionally.


To accommodate the most people we surpassed tables and taped long paper to the floor. 
Each paper had scissors as well as elmers glue, glue sticks, and colored masking tape (also available through U-line or Dick Blick- U-line was cheaper!) for adhesives. There was a hot glue station to the side for adults. 

By the end of the week each color had 3 sessions of artists that had added to it.


On the last day we encouraged people to make standing sculptures for the floor in front of the wall or really long pieces we could weave through and dangle from the installation.


The sculptures were attached by masking tape and wire to the fishing lines or to each other. 
We hung them up at the end of each session. 


One challenge with using the plastic bags as a material was that most people wanted to blow them up and then make either a hot air balloon or a face out of it. The balloon-like sculptures were great for the first day and created a continuous rhythm through out the sculpture but then we really really emphasized other ways you could use it:


5 days, 25 sessions, 850 kids (plus about 1000 adults) later!


Major props to Nora, the family programs manager who advocated for us to do ticketed sessions instead of a constant free-for-all and who was amazingly organized and thorough in planning this with me!
And gigantic shout-outs to Cortney (Nora's intern) who sorted massive amounts of materials by color
and my awesome awesome assistant Lauren who really put her all in the entire week with me!
I also had fantastic help from the teen arts council interns and some of my sixth grade students. 
Thank you guys!
I couldn't be prouder of this!