Showing posts with label collage. Show all posts

Wednesday, March 5, 2014

4 part still life project - middle school

4 Part Still Life Exploration with 8th grade
on 18x24 paper split into 4 9x12 sections

Students chose their still life object.
It had to be bigger than their hand with limited text.
I steered them away from stuffed animals and fuzzy/furry textures. 

I would absolutely do this project again and keep the order in which I introduced the parts. 

This was wonderful for differentiation-
it allowed all levels of students to learn a lot, better their skills, and feel comfortable. 


1. Realistic pencil drawing of the entire object with shading. 
(2-3 class periods)

2. In the style of Romero Britto. 
(3 class periods with introduction/quick slide show)
Students must zoom in on the object, with the option to abstract it. 
Using marker they broke the section down and filled it in with bright color to make it pop. 

(toaster abstraction)

3. Collage
(3-4 class periods depending on type of collage they chose, with slide show)
Students could choose the composition for this section- with the option to zoom & crop or showcase the entire object. 
I showed LOTS of examples of different types of collages. 
They could choose their materials- I suggested magazine cut outs, newspaper, or tissue paper. 
They had to include a background. 


4. Acrylic painting
(2 class periods with introduction to painting/demonstration)
This was the final section of the four.
Students had to look at their image as a whole and figure out what type of composition was needed in order to make the entire paper feel balanced. 
Most of them have never used acrylic paint before. 
Color options and backgrounds were up to the them. 
Students decided if they wanted to paint the object in colors true to life or not.


Suggestions if you are limited on time:
- you can cut down squares & stripes ahead of time
to collage for stripe or checkerboard backgrounds
- select the objects ahead of time and limit the objects they can choose 

More finished examples to come!

Thursday, February 6, 2014

Figure drawing & magazine page color collage


This was one of my first lessons of the year. I didn't know this group of 6th graders so it provided a strong opportunity for any ability and type of learner. 
The students began by doing figure drawing exercises and drawing one another in poses. 
We also did a class project cutting out colors from magazine and working as a class to create these cool color wheels. I did this with all of my class at the beginning of the year. 


Students chose a pose to draw the silhouette of. 
Then they filled in the silhouettes with a color palette/strategy of their choosing based on the color wheel making experience. 


I really wanted to take advantage of getting a fresh start at my new school and with new students. 
So this year I have been having the kids do their own grading sheets at the end of each project.
That way they are able to see all of the objectives they met and how much they just accomplished and learned through the lesson.
Now they are in the practice of learning how to write artist statements and reflect on their art-making process. It has also positively affected peer constructive criticism and classroom discussions with everyone participating willingly. I'm including the pdf in case you are interested. This process of assessment has been working out very well. Now that my sixth graders have done 4 of these grading sheets and writings with specific prompts they can are able to actually formulate thoughtful and more complete artist statements all on their own without prompts this specific.


Wednesday, August 21, 2013

Did ya' see?!....

Roylco featured my 
Rock n Roll Romare Bearden lesson on their blog today!

Click here to check it out. 

Wednesday, May 1, 2013

Kinder Habitat Accordion Artist Books


My inspiration for this project came from That Artist Woman's tutorial of how to make file folder books!
Her examples are amazingly paint and collage filled. Due to the very small size of my classroom and other constraints I couldn't approach my project with covering the pages with so many materials but the file folder book worked still worked perfectly as the basis for this project. It was actually how I came up the idea to put the habitat studies altogether rather than making separate pieces of habitat-inspired art this year. 
(Thank you Gail!)


Kindergarten made "Artist Books" that showcased four habitats that they had studied in science. 
Each habitat had artwork made in the style of a notable artist. 
I specifically picked two male and two female artists and very different art styles to focus on. 
The file folder books worked great because each artist and habitat had a: 
-back ground artwork that was attached to the book
-an animal for that habitat that could be housed in the pocket but then taken out
-a title paper for each habitat and artist

Our artists & habitats:
1. The coral reef in the style of Georgia O'keeffe
2. The rainforest in the style of Romare Bearden
3. The arctic in the style of Lee Krasner
4. The desert in the style of Roy Lichtenstein


1. Coral Reef in the style of Georgia O'keeffe : color variation & paint
For this I had the students focus on how Georgia O'keeffe is able to create many shades of a color, looking at the various tones of blues and reds and purples she includes in each piece of art. 

Background: 
Crayon resist with construction paper salmon/coral colored crayons,
we painted with watercolor using two different blues (royal blue and turquoise)
to try and mimic O'keeffe's variation in color. 

Animal:
Seahorses!
The kids drew horizontal yellow marker lines on the watercolor paper before painting it
to create the seahorse texture then cut out the seahorse shapes. 

2. Rainforest in the style of Romare Bearden : collage

The background and animals focused on collage of course!
Background: tree trunks of brown construction paper and then lots of leaves using tissue paper.

Animal:
Parrots!
I had saved rainbow painted paper the kids had made a while back. 
We used the paper to cut out the feathers for the parrots. 


3. Arctic in the style of Lee Krasner : Abstract Expressionism & movement

I've never really taught a lesson about Lee Krasner. The more I read about her the more fascinating I found her to be. (And she really made me proud to be a woman artist!)
Did you know she's only one of four woman to have a retrospective at MOMA??
(the others being Helen Frankenthaler, Louise Bourgeois, Elizabeth Murray). 

Background: Painted icebergs and snowy water with white tempera. 
 

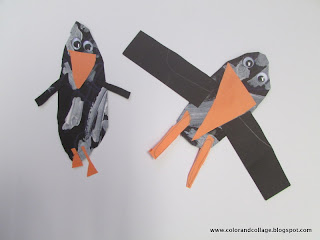
Animal: Penguins!
They were cut out of a black paper painted in the style of Krasner with white tempera using moving brush strokes.


*The bottom black section was saved to cut the penguin wings out of.


4. The Desert in the style of Roy Lichtenstein : Pop Art

As we looked at a slide show of Lichtenstein's work I had the kids focus on the limited color palette, bold patterns of dots and lines, and cartoon-ish outlines. 

    
Background: Using Lichtenstein's Sunrise as inspirations students created their own version using thin Mr. Sketch markers. The cactus was drawn and cut out separately and then glued down. 

Animal: Lichtenstein Lizards!


Some final products:


The back of the book had bios of each artist. 


Monday, April 8, 2013

Romare Bearden's Rock Stars


First grade made these super fun collages while studying about Romare Bearden's life and artwork. 
Did you know he was an artist, musician, baseball player, in the army, and had a teaching degree?
So interesting!

There are an abundance of great resources for teaching meaningful in-depth lessons about Bearden. The National Gallery of Art has a fantastic booklet in pdf form (click here ), lots of information on The Bearden Foundation website, and there is a Dropping in on Romare Video (best for grades 2-4) but great for examining his work in depth. 

In the Dropping in on video they show Romare's cat and then you realize the cat is in some of his art works as well. We added his cat to our pictures which is why there is a random cat on some of the rock and roll sets. Some of the kids dressed the cat up as well. Pretty hilarious. 

Early Carolina Morning
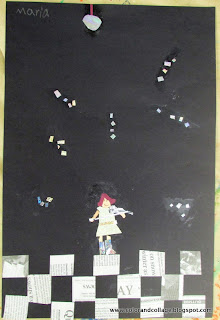
Using the checkerboard floor inspiration of Early Carolina Morning the kids started by making 3 rows of checkerboard by gluing down squares of cut up newspaper. (Some of them didn't quite get it as you can see- but for the ones that did it looked really cool.)

Using jazz music and performing musicians as our inspiration the students made musician collages. 
I had photocopies of instruments the kids could cut out for their collage. They had to create a person with the instrument in mind so that the position of the arms made sense. 


Empress of the Blues


Materials we used:
-Newspaper squares for the floor
-Clothes: either fabric or wall paper scraps
-Skin: I bought Roylco skin color paper this year- it has been great for lots of projects.
-Photocopies of pictures of guitars, banjos, brass instruments
-Construction paper scraps
-*** The real crowd please was the hologram paper for the disco ball.