Showing posts with label tempera. Show all posts

Sunday, March 9, 2014

Impressionist ocean paintings and ipads


This lesson successfully tackled monochromatic color mixing, interpreting light and nature, impressionism, and expressionist painting. 

I did this lesson at the very beginning of the year with seventh grade. I was just starting at my new school and wasn't sure where my students skills were at- this lesson worked really well as it gave me a chance to see what they knew and were comfortable with but gave them a more open ended way of working. Tempera paint was all we used. It would be great for 4th through 7th grade. 

We have a one-to-one Ipad program at my school. It has been incredible for my art teaching, opening up so many possibilities for my lessons. This was the first lesson I used them for.


My students went down to the waterfront with me [in the ten minutes it rained that day of course] and took photos of the ripples in the bay from the docks. (I know, I know, I'm living a dream right now...) but seriously... the students cropped the image down and translated them into paintings. I provided a slide show of Van Gogh, Monet, and Homer's paintings that all included water before they began painting.

References to Van Gogh, Monet, & Homer


Thursday, April 11, 2013

Paper Marbling


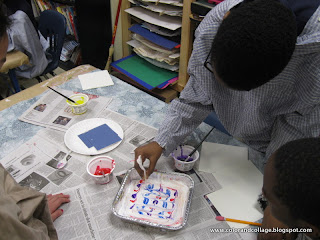
Somehow after thinking I've tried everything I realized I've never tried or taught paper marbling with shaving cream. I rounded up the information from a handful of websites and posts so I'm not going to link you to one specifically. Hopefully my pictures are helpful for those wanting to try it though. 

I did this with 6th grade- I did a demo and then they broke into groups of 3-4.
A great teamwork activity!


**For the paint: I slightly watered down my already watery cheap-o tempera paints that I have no use for. My sample with tempera cakes worked also.

Other materials:
Shaving cream (barbasol is fine) 
Cut up mat board or cardboard as the "squeegees" 
Forks, knives, sticks, straws, or "sporks" as we have at school - for dragging the lines.
Tin foil trays
Paper cut down (I had two per kid- 6 x 6")


Spread the shaving cream out in about a half inch layer like frosting

Emphasize to the kids that they should apply the paint in a strategic way. 
The "confetti" approach as I call it albeit fun to do does not come out as cool. 


Demonstrate dragging a tools through the paint puddles going back and forth in one direction-

and then going the opposite cross direction for the next round.


Press the paper down into the paint/shaving cream with medium pressure.
Scrape the shaving cream off with the squeegee tool. 
We had lots of newspaper to keep the tables clean and not overwhelming as we went along.
The kids waiting on their turn to print the paper are helpful for making sure there is an open newspaper to place the shaving cream covered paper down on for scraping. 

You can build off the color remnants in the trays rather than rinsing it all out every time.


... and OF COURSE I forgot to take a picture of the final product after I wiped off the shaving cream. 

But I do have this lovely picture of a bunch of samples:


Monday, March 4, 2013

Plaster house sculpture in the style of Ndebele Painted Houses


This lesson is based on the brightly painted houses of the Ndebele in South Africa. 
It was a great lesson on sculpture, architecture, and style.


My sixth grade has had a year-long focus on "style"- what it means, how to identify it, variations in, etc.
In addition to looking at the houses we discussed how a style can influence other art for years to come and how we can identify style. 
To help identify key Ndebele style characteristics we looked at these images after looking at the houses:


-Materials List for this Lesson-
Armature/base:
empty milk cartons, 
mat board (6 x 8" ish)
plaster strips
Gate:
glue gun
mat board scraps
model magic
Painting:
pencil and rulers worked to draw right on the plaster
Tempera - some cracked
we used some Acrylic as well to prevent it from flaking off more
Acrylic medium for sealing or sometimes I mixed it into the tempera
*If I had an outdoor space (and not been in the middle of the city) I would have taken them all outside and spray coated them.

We collected empty milk cartons and rinsed them out. 
My school has a subscription to Brainpop- we watched the "sculpture" video.
This explained how an armature works as well as different types of materials used the kids were unfamiliar with. Then we talked about using the milk cartons as armatures for the houses.
I hot glued them to mat board and then we covered them in plaster strips.


The Gates 
This is where we discussed architectural design.
The students cut up mat board scraps and arranged them where they wanted them.
I hot glued them together. 
They covered them in a thin layer of model magic to create a plaster-like texture when it dried.


The design and painting was up the students. 
They had to consider geometric designs, patterning, and bold colors. 
Drawing with pencil on the plaster before painting worked well. 

Beginning painting stages:


They painted the gates separately and I hot glued them on with folded mat board tabs behind them to support. This worked well.


Additional resources:
(I was unable to find any good/useful short videos.)
Ndebele: The Art of a Painted Tribe by Margaret Courtney-Clark
April 2012 Ndebele Inspired Houses lesson in School Arts

Tuesday, February 5, 2013

winter shade and shadow landscape


I based this lesson on these two pins but gave it a winter twist:

value study, Grade 5

 Tints and Sharks

Day one we worked on tints and shade mixing with blue for the sky around the moon.


Day two we discussed shadows, added on snowmen and their appropriate shadows and a small house in the distance demonstrating depth. 
(I apologize because these are some of the worst pictures I've taken in a long while.)


Friday, December 7, 2012

Robots!


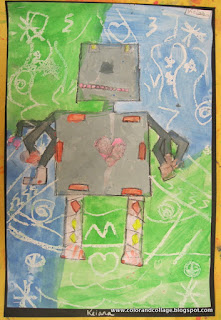
Second grade robots began with an investigation comparing
geometric lines and shapes vs. organic lines and shapes.
Then we dove into designing robots that had many parts and purposes!

Robots were drawn in pencil, outlines in black crayon, with a heart of cogs and gears colored with pink colored pencil, and a few highlighter details for lights. 


This books was a great inspiration! 

The Robot Book by Heather Brown

and this page with the cogs in the heart inspired the hearts we added to our robots:


Then we painted using shades of grey.


Lastly, we added details of metallic paint and painted in the backgrounds
with white oil pastel resist and tempera cakes.