Wednesday, May 2, 2012

Power of Art - Post 1

This past week I attended the Power of Art program at the Lab School of Washington in D.C. and put on by the Robert Rauschenberg Foundation.
It was AMAZING!
I HIGHLY recommend all of you reading this to apply next year. Around 30 applicants are selected each year. I have never felt more appreciated in my life for the work that I do than while I was there for 36 hours. 
And it was an incredibly enriching experience that I can directly apply to my career as an art educator.

I will post more about my experience but wanted to get started by sharing a great interactive lesson that was developed and led by one of the elementary art teachers and one of the theater arts teachers. 
It is based on the artwork of Elizabeth Murray and explores emotion and color. 
Elizabeth Murray, if you are not familiar with her work, creates bright sculptural paintings. 
There is an Art 21 segment about her well. 

As the students were given the option of doing 'elation' or 'frustration'.
We chose a large color paper that we thought showed that emotion.

Then we cut it into a large shape showing that emotion.


And added on oil pastel or crayon. (In the background is a video of the students who took part in the project at school.)

When we were finished we pinned them up on the board for that emotion. We had two big boards to work with one for each emotion. Then we stepped back and examined the composition and could make changes.
 Frustration:


Elation:


Following the art-making we did an an interactive activity. 
This was a
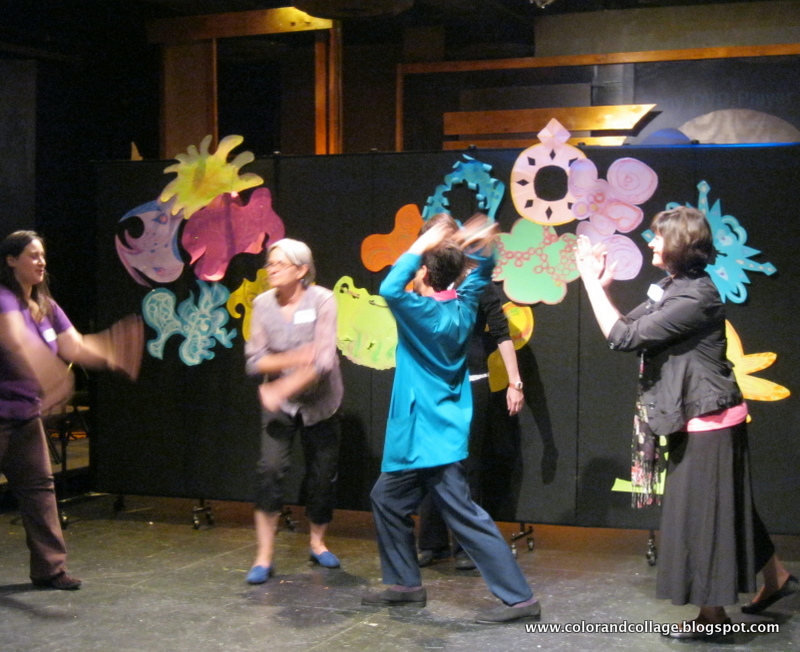
Fluid Sculpture Exercise from Playback Theater:

4-5 people take part for each demonstration
A title is given for the sculpture ahead of time (a suggestion from the audience)
then "let's watch". 
Starting with one participant they create a repetitive movement (that can also include a sound!) that demonstrates the title. 
The first person continues with their motion, while the second person starts their motion, and so on... until all five people are doing their motions and have created a fluid sculpture. 


I will be posting much more and many pictures of all of the amazing artwork the school displayed!


Monday, April 30, 2012

first art show

Last week I hosted my school's first Art Night. 
Well I called it an "Arts Showcase and Activity Night".
We are in a temporary space, not our permanent school yet- and really don't have much space. 
I wanted a way to engage the families for a longer than a five minute pop in so I organized activities around the theme of recycling. 
I will post more about it this week--- but for now wanted to show you my first grade ladybug name tags. 
I've been on a little bit of a ladybug kick lately
so I rounded it out with these nametags after getting the idea for the moving lady bug wings with paper plates via pinterest.

 I photocopied the lady bug shape and sentences for the students to finish on thicker paper.
The kids filled them in and cut them out, then made their wings out of 6" paper plates.
I loved that they had surprise writing inside.
(This one ironically is not the best model.)

The sentences they had to complete were:
An accomplishment in art class that I am proud of is:
and
Art helps me:


I also finally got a chance to try out the TP roll project I've had my eye on forever!
It worked awesome. 
Elmers glue and clothespins to hold them in place while the glue sets. :)


Stay tuned!

Sunday, April 15, 2012

Spring Display

My recycled garden banner was added under my "Spring" sign and looks so happy and colorful!
(just in time for my april vacation week off too!)
My kinder students each colored a 1.5" square which is what I made the frame around the letters out of. 
 The flowers were made by drawing with Mr. Sketch on coffee filters and adding water with brushes- messy to make but you gotta love a no-fail-beautiful outcome. 


Tuesday, April 10, 2012

recycled paper flowers


Kindergarten Garden
featuring recycled papers (you'll notice the cereal bowl tops and scraps from previous projects)


They came out pretty well the first day so the kinder students 
got another go at it so they could take one home as well.


Wednesday, April 4, 2012

Cherry Blossom Trees


It's that time of year again... Cherry Blossom time!
This year I did a one day painting lesson.
1st- thin brushes to paint with brown for the tree trunks and branches
2nd- q-tips for the pink cherry blossoms
3rd- painted with bigger brushes using green and blue tempera cakes for the ground and sky.


They came out really lovely!