Thursday, April 14, 2011

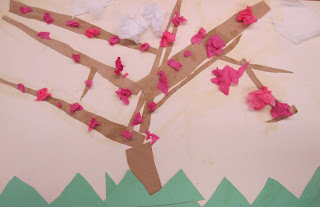
Kinder Cherry Blossom Trees


This lesson took two 30-minute class sessions. We discussed attributes of Japanese cherry blossom trees and the parts of a tree. Using recycled pieces of grocery bags the kindergarteners cut up strips and then "built" a tree starting with the trunk, making sure to incorporate interesting branches.


After crumpling up various pink tissue paper pieces and adhering them with glue stick the students added on clouds of white tissue paper and practiced their angle cutting skills by cutting green construction paper scraps for the grassy ground. 


Thursday, April 7, 2011

Matisse Posting #3: for the younger ones

The following are examples of K & 1 students after examining paper cuttings by Matisse.

Kindergarteners testing out cutting symmetrical shapes and spaces and arranging the elements:


The first graders had a little more exposure to symmetry so we focused on constructing interesting compositions out of the cut paper, added cut scrap paper, and stamped circles and lines with scraps of mat board and empty glue sticks dipped in tempera. 


This was a follow up activity- drawing with white and black crayon first and then adding marker.
When the students finished we looked at each others papers to see what the shapes reminded us of.


Kindergarten Goldfish Bowls:


Selections from my informative (in progress in some pics) bulletin board:


Matisse Posting #2: Color Harmony


After the Black and White collage lesson I showed my students the video Dropping in on Matisse. It is a great video- about 25 minutes, and even if you don't have time to show your students its worth watching to get an idea of how to present Matisse to students and prompts for VTS.

We moved on to the concept of HARMONY- which is actually quite difficult to translate to young students in a way that they can apply to artwork and their own compositions. I begin it by asking them where they have heard the word "harmony" (they will most likely say music) and then we take it from there by drawing connections between musical harmonies and harmony in artwork.


This was a very clear-cut directional lesson where the students had to follow along rather than it being an exploration in materials.
Each student used a 9 x 9 square of white paper as the background.
Each student got three colored pieces of tissue paper, a scissors, and a glue stick.

1. The kids were instructed to choose one color to start with. They had to cut or rip one large piece and glue it down on the white.
2. The kids chose their second color- and could cut or rip 5-8 small shapes/pieces and glue them down.
3. The kids used their final color to cut one medium shape and glue it down.
** Then the students evaluated their composition and could add on other pieces they felt necessary to "balance" out their collages.

As a class we examined the artwork and identified which compositions prompted the viewer's eye to travel around the entire page- and identified the primary and secondary focal points of the compositions.

Matisse posting #1: Black/White/Gray Cut Paper


The first part of our fifth grade Matisse exploration was a viewing of various Matisse paper cuttings.
We focused on identifying the use of organic shapes and positive/negative space. We looked at how he used a variety of sized shapes and how his compositions prompt the viewer to look around the entire page.

The task was for each student to use a 9 x 12 gray construction paper as their background.
The pieces for cutting were black construction paper, white drawing paper, and newspaper (only b&w- no color pictures or text).

I think this lesson was very effective for the students. We were all pleasantly surprised by the range of compositions the students were able to create with limited materials. They all truly gained a better understanding of composition. As they worked I would emphasize using both organic and geometric shapes, a variety of sizes, and considering repeating or patterning elements, and overlapping (i.e. "If you have been using all small shapes, consider using a bigger shape." as they worked).

Wednesday, April 6, 2011

1st Grade Desert Habitats


I do a lot of lessons coinciding with the first grade study of habitats. I usually do ocean, arctic, and rainforest environments. This year I decided to add in a desert lesson. It took about six classes to complete but they came out really great. The book Cactus Hotel by Brenda Guiberson is a great resource as well.


Part one: The students and I talked about the attributes of a desert habitat environment and what types of animals live there. We discussed what a cactus is and I showed them images of some Saguaro Cacti.
We also discussed the concept of close up and far away. The goal for the day was for the students to draw one large close up cactus and one small cactus far away as well as a horizon/land line.


Part two: The students colored in the cactus using a variety of green-hued crayons. They then outlined the cacti in dark green oil pastel.

Part three: Glue sand along the bottom land area of the picture and watercolor the sky. (I used liquid watercolor.)


Part four: Animals! I discovered that there are TWO animals in the desert that have black and white stripe patterns (and we all automatically think of zebras and white tigers to have black and white stripes, ha!).
Students made :
Gila Woodpeckers-- They drew the woodpeckers on brown construction paper, colored the striped wings with black and white oil pastels, and put a red spot on the head with oil pastel. Then they cut them out.
Zebra-tailed Lizards-- They drew the lizards on manilla paper, used rubbing crayons and texture tiles for for the lizard skin and colored the tails with black and white stripes using oil pastels. Then they cut them out.

Part five: We arranged our elements and glued them together!